It's been quite some time since I've made a post it seems.
How to make magazine files using cereal boxes. You can find all sorts of things to do on Youtube. I look for stuff and I may modify it to suit my needs or make the process easier.
I've chosen to take the cereal box and measure how low to cut the front depending on the size of the magazine and how much you would like to expose. If it's a large cereal box, you can measure the height of the magazine and cut to size. Once I decide which magazine will go into the file, I measure the sides. I draw lines from the top down to where I would like the height of the front to be for viewing the magazine spine.
Using a box cutter or Xacto knife, I cut from the top down on each side of what will be the front. 3" to 6" depending on the size of thecereal box is a good height for the magazines. Fold back inside of the file to create added support to make the file sturdy. You can fold the sides inward at an angle or cut them with the box cutter or Xacto knife from back to front. If the back is too high, use the same technique as you did for the front. Cut on each side until you have reached the desired height and fold inward for added support.
Take two sheets of 12 x 12 scrapbook paper of your choosing. Keeping the same design makes for a more professional store bought look. Wrap the sheets around the box to measure. If the box is large you will want to make sure you cut the paper in large strips so you will have the access to fill in the gaps. I prefer to glue the box as well as the paper. Don't put to much because you don't want it to be wet and cause the paper to buckle. I prefer Elmer's Glue-All Multi Purpose Glue. Smooth out the paper so you have an exact fit. Now if you are using the large cereal box, you can use the scrap piece of paper first or you can lay it over after you have put the other two sheets in place. Depending on the ceral box and the color of paper you are using, you may choose to just leave it. It's your file, you can do whatever you feel like doing. I prefer to glue one section at a time. This way you can see if you need to make modifications.
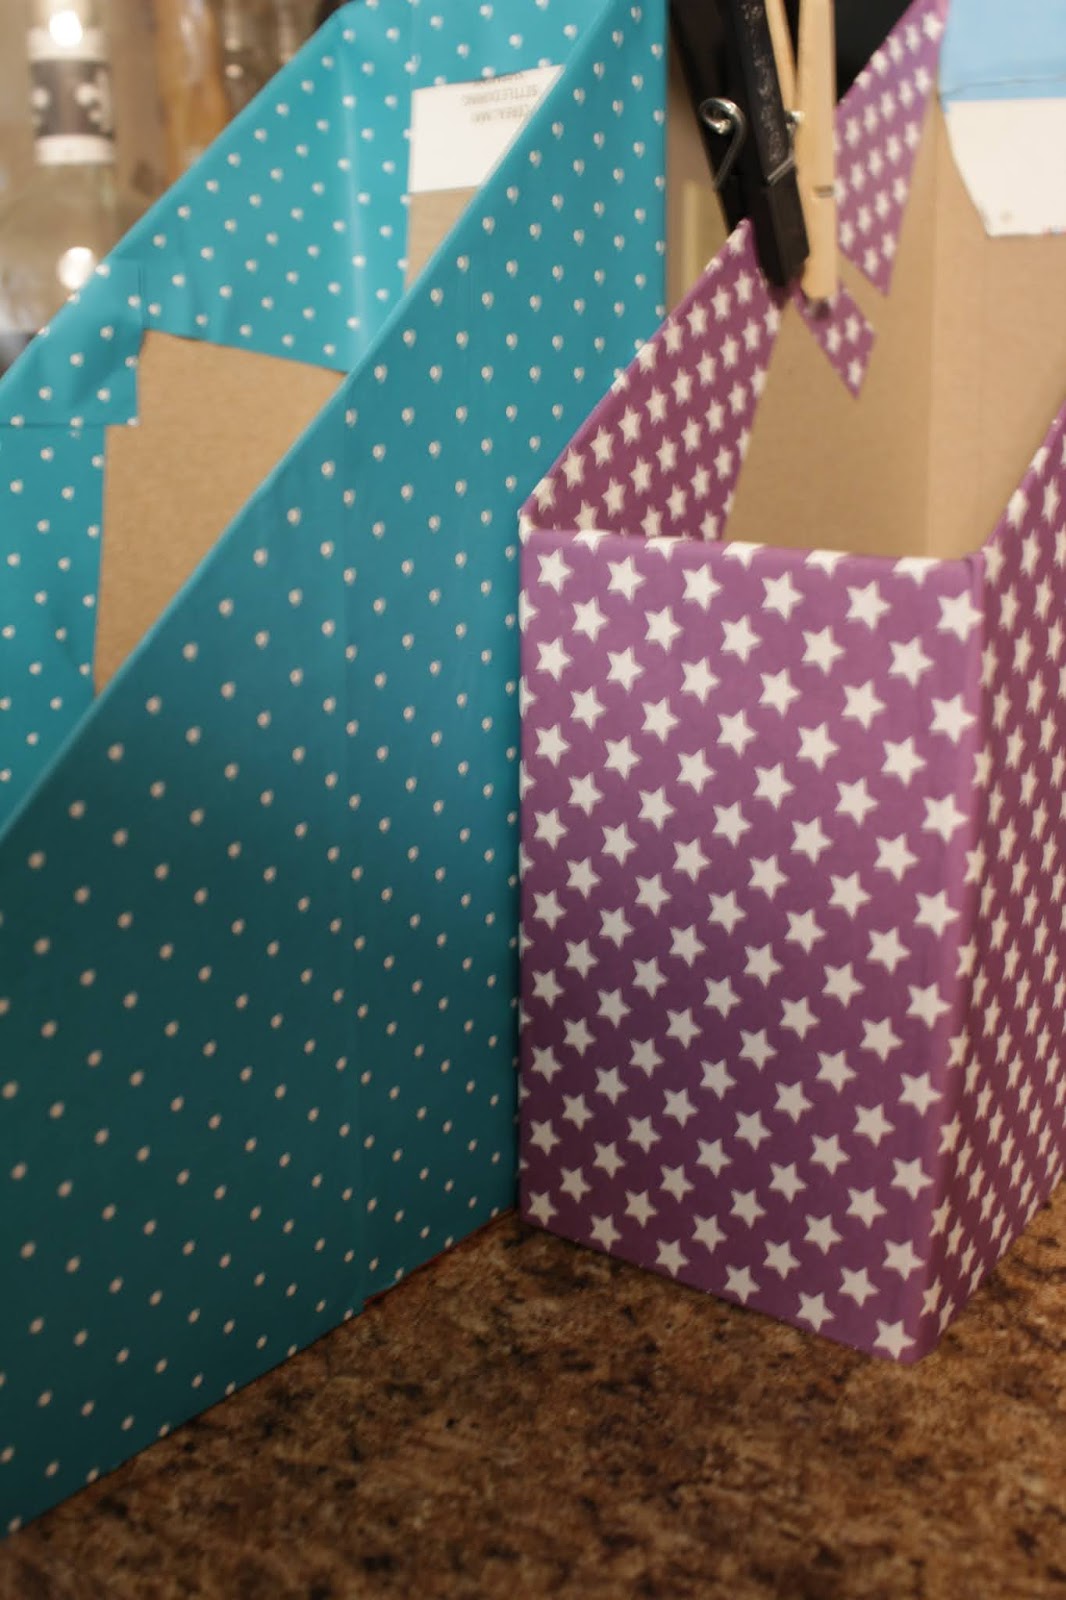
Use clothes pins or clamps to keep paper in position. Smooth paper from bottom to top or from front to back or vice versa depending on which part you are working on. By doing a section at a time you can place the file on its side and put a heavy weight inside to make sure the glue is bonding. You can finish the project in a few hours or if you have a craft room you can take longer making sure it is absolutely perfect.
If you try this project let me know how it comes out.
Showing posts with label crafts. Show all posts
Sunday, July 5, 2020
Friday, February 17, 2012
Happy Mardi Gras
I've decided I would connect all of my blogs with the theme of Mardi Gras. Each one will cover Mardi Gras in the sense of how it connects to New Orleans.
This image is a drawing I did many years ago. It was just a doodle and then it turned into this elaborate piece of art on a little piece of paper. I want to try and redo it on a larger piece of paper. Maybe I'll even put it on canvas.
Mardi Gras is as big of a deal to some New Orleanians as is Christmas or Halloween to others. This photograph represents a home in a which someone probably belongs to one of the Mardi Gras organizations.In New Orleans the Carnival season begins on January 6. It is also known as Twelfth Night. The season comes to a close on Fat Tuesday, but in between there are parties, balls, parades and fun.
Mardi Gras in New Orleans is something everyone should experience at least once. There is nothing like it anywhere else. The entire city gets involved. The Krewe - this is the organization that puts together a specific parade. They select a theme and then sketches are created to bring that idea to life in the form of a float. The number of floats that will be a part of the parade depends on the number or members. Some parades have as little as ten floats and the larger Krewe’s can have up to 30 or more.
The floats started out as paper mache coverings over wagon bases. As time went on and technology progressed so did the artist value of these floats. As newer Krewes came on to the scene fresher ideas were introduced and by the early 70’s something known as the Super Krewe was created. Endymion and Bacchus began the competition to see who would put on the better show.
Night time Parade goers throw their hands up for beads. "Throw me somethin' Mister." is the signature phrase. The beads that were thrown from the floats were once made out of glass and over time they were made out of plastic. It was a little less dangerous. Some terminology to know: Krewe beads are beads that have a medallion with the Krewe's name on it. Doubloons are coins with information about the Krewe. The theme of the parade, the year and if you're lucky you made get a special dabloon from the king, captain or one of the co captains. Some organizations have doubloons representing the Mardi Gras colors, purple, green and gold. Purple represents Justice, green represents faith and gold represents power. I'll be writing on the main blog about Mardi Gras ending on Tuesday just as it all comes to an end. I will include some of my favorite images and the stories behind them.Find out more at http://dlonzo-OpenYourMind.blogspot.com
Thanks for stopping by, keep an open mind.
Labels:
balls,
Carnival,
costumes,
crafts,
Dlonzo,
Mardi Gras,
New Orleans,
paper mache,
Parades,
Zulu
Wednesday, December 7, 2011
Painted ornaments

The above design is one that I did for a tee shirt many many years ago. It actually glowed in the dark. I decided I wanted to keep the design and I framed it.It was during my time of creating one of kind pieces of fashion and art. The image was inspired by a Nagel lithograph I saw in a book.

The above is a cross that I'm working on to give to someone as a gift. When I arrived in Austin I noticed that a lot of Hispanics have crosses on their walls and so a collection was formed as people were giving me crosses to hang. Then I started making them. I've always had a fascination with the crucifix.

These ribbons will adorn my Christmas tree once I am finished and I put the tree up. That will probably be the project for the weekend since it will be cold.
Thanks for stopping by; keep an open mind. I hope to launch Nexx Fazz again and share some of my art tips via video.
Friday, December 31, 2010
Absolutely the last entry for 2010

Art outside of a bookstore/gallery on Frenchmen Street in New Orleans. FM Books in the Marigny I believe is the full name.
(I posted the wrong entry to this blog.)
As the year comes to a close I start thinking about some of the things I saw this year that I could create. Some of them I did create over the holidays. I decorated wine bottles and filled them with M & M's which added to the Christmas theme.
I had thought about buying chargers, but I could never find the color I wanted and the price I thought was a bit much at $1.99 or higher. I finally caught a sale at Wal Mart when they were have price, 4 for $2.50 which put them at about .62 cents each.
They work well with the decor and now I can decorate them to add a little more style and art. I'll have two that I can display as art and if I like the way it looks then I can decorate the ones on the table in a similar fashion.
Since I'm big on recycling, the possibilities are endless as to what you can do with the stuff that you have.
You really don't have to spend a lot of money because most of what you need is lying around the house. Candles, scrapbook paper or newspaper, hole punch, glue or hot glue and photographs. You are only limited by your imagination.
Thank you for stopping by and do come back next year as I present more art and craft ideas.
Wednesday, December 15, 2010
Creating gifts and decor for the holidays

One of the crosses that I created in 2007.
There are many things we can make ourselves that we can share or use to decorate our spaces. We first learn to do this when we are kids in grade school. We learn to make cards, or small Christmas trees. We then move on to creating larger works of art or crafts.
I surround myself with my art as well as that of other artists. I have countless books that I look through to get inspiration from time to time.
During Christmas you see so many things that you'd love to have, but you either don't have the space or the price seems a little rediculous. For me I have to look back and think because I know I can make something that I see for little of nothing. I usually stock up on supplies when I find a bargain so I have most of what I need.
I've always admired the angels that you see, but I'm not going to pay $24.99 or higher for something to use once a year. I thought wouldn't it be great if I designed something that I could just leave up all year round. Then you don't have to worry about where to put something as you have placed something in that spot after Christmas. If of course that is the case then make sure you take photographs and you can remember where everything was the previous year. Then you can make changes accordingly.
If you are going to make a seasonal display here are a few ideas I'd like to share. Take a jar, or grits or oatmeal box and removed the wrapping. Cover it with colorful ribbon or scrapbook paper. Fill it with your favorite candy or flowers. You can also buy some candy canes and put them all the way around and still fill it with other candy or flowers. It's a multifunctional center piece.
Back to the angel. If you take a wine bottle with a long neck you can decorate it with some felt. Depending on if you want it to be only used for Christmas or leave it up all year round pick a color that will work for any season. Felt comes in all different colors and styles. You can even find embossed or glittered felt.
Cur out your wings from cardboard and cover them with felt. You could even do two sets of wings and that way your only changing the wings for the holidays.
Take a doll head or a round wood block and glue it to the top of the wine bottle. Paint or draw on the eyes and mouth. Attach a halo and finish decorating your bottle with some sheer ribbon or fabric. This can also serve as giving you a seasonal look that can be removed after the holidays so that your angel can remain out all year round. You can create arms using colorful pipe cleaners. The possibilities are endless, just use your imagination.
You can also take a wine bottle that has a bowl shape to create the face of a Santa or an elf. After removing the label, put on some squiggly eyes, a beard, mustache and eye brows. Use the long neck at the hat. Cover it with felt and add a pom pom at the top. I've given you the tip now make the idea your own.
Labels:
Art,
Christmas,
crafts,
creativity,
Hobby Lobby,
Holidays,
Michaels
Friday, October 29, 2010
Candy Arrangements
If you like candy, but you keep it on hand for guests, why not make decorative arrangements. There are many things that can be done. One can get great candy dishes or one can take jars and make their own. Find a jar with an unusual shape, decorate with ribbons or scrapbook paper and then fill with candy. Another thing that you can do is to make a candy floral arrangement using tootsie pops. Wrap pops individually or a few in colorful tissue paper and then arrange in the jar. They make great gifts for anytime of the year. People love getting gifts that aren't planned and those that are handmade add that personal touch.
Thanks for stopping by, do come back again.
Take care
Open Your Mind
Dlonzo
Thanks for stopping by, do come back again.
Take care
Open Your Mind
Dlonzo
Labels:
Art,
Artography,
Candy,
crafts,
digital art,
Michaels
Wednesday, October 13, 2010
More with scrapbook paper

The latest in scrapbook paper art. I have several sketches of dancers and I took another drawing and created a silhouette using the colorful scrapbook paper. You can make your own work of art with the right frame and matting. Be creative, cut out butterflies or dragonflies. Create an entire scene cutting out intricate detailed silhouettes using various scrapbook papers and colors. You are only limited by your imagination.
http://www.dlonzo-OpenYourMind.blogspot.com
http://vids.myspace.com/index.cfm?fuseaction=vids.individual&VideoID=58144381
http://vids.myspace.com/index.cfm?fuseaction=vids.individual&VideoID=54325957
http://vids.myspace.com/index.cfm?fuseaction=vids.individual&VideoID=54365247
Labels:
Art,
Artography,
crafts,
Dlonzo,
Hobby Lobby,
Michaels,
scrapbooking
Wednesday, December 23, 2009
Holiday Art

One of my ceramic angels when I was looking for Christmas items that resembled me. Since I couldn't find them I created them myself. You gotta do what you gotta do.
LOL
I’m always thinking of new ways to create art. The holidays are always a good time to create different things to keep or give away as gifts. I had been saving some wine bottles to create stylish vases. One bottle I was going to create an angel, it was from a bottle of Italian wine, and its shape is that hour glass figure like a woman. Add wings during the holidays and if they aren’t very Christmassy you can leave the bottle out all year round. Of course art doesn’t have to be seasonal. I have a hand carved black Santa that is visible all year long as are my angel ornaments that hang over the fire place. I have other ornaments that I place in a large vase and they can be seen all year round.
So back to the wine bottle. I removed the label and since the bottle is clear, I decorated it with several red and silver snow flakes. Since the bottle has a screw cap I filled It with M & M’s and it makes for a very colorful and cheerful display. It could also make a great gift for someone that likes M & M’s.
Subscribe to:
Posts (Atom)


